On our video training site, WP101, our focus is on helping members feel confident with WordPress and grow their websites over time. But we learned that churn (members cancelling their subscriptions) is a common challenge, even when the content is genuinely valuable.
In many cases, members don’t cancel because they’re unhappy with the content. They cancel because they get busy, forget to log in, or lose momentum.
That’s where automation made a real difference for us. By adding a few simple workflows, we were able to stay connected with members at the right moments, reduce cancellations, and keep people engaged without extra manual work.
In this guide, I’ll share the exact automation strategies we use to improve member retention. They’re easy to set up and can have a meaningful impact on your membership revenue.
TL;DR: Reducing churn on a membership site comes down to staying connected at the right moments. This includes using automation to:
- Welcome new members.
- Drip content to prevent overwhelm.
- Re-engage inactive users.
- Recover failed payments.
- Celebrate member milestones.
- Offer smart alternatives when someone tries to cancel.
Why You Need Smart Solutions for Member Retention
Churn can really hurt the subscription revenue on your membership website. When members cancel, you are forced to constantly hunt for new signups just to maintain your current income.
To fix this, you must understand the two types of churn:
- Voluntary churn happens when members choose to leave because they lose interest.
- Involuntary churn occurs when payments fail due to expired cards or bank errors.
Here is a quick breakdown of common membership terms you should know:
| Term | Definition |
|---|---|
| Churn | The percentage of members who cancel during a specific period. |
| Voluntary Churn | When members actively choose to cancel their accounts. |
| Involuntary Churn | When memberships end due to payment failures or expired cards. |
| Retention Rate | The percentage of members who stay subscribed over time. |
| Dunning | Automatically retrying failed payments and sending reminders. |
| Drip Content | Releasing content on a schedule to keep members engaged. |
Manual retention strategies might work when you are just starting out, but they become impossible to manage as your site grows. Eventually, there aren’t enough hours in the day to personally email every single member who forgets to update their credit card.
That is where automation becomes essential. It handles these tasks 24/7, ensuring no member slips through the cracks while you focus on creating great content.
Here’s a quick overview of the automation strategies I will cover in this article. You can use the links below to jump to different methods:
- Automate Your Community Welcome Committee
- Keep Members Coming Back With Drip-Fed Content
- Re-engage At-Risk Members
- Simplify Payment Issues with Automatic Reminders
- Celebrate Loyalty With an Anniversary Gift
- Save Departing Members by Understanding Their Needs
- Frequently Asked Questions About Membership Churn
- Additional Resources for Membership Websites
1. Automate Your Community Welcome Committee
In my experience, the most important moment in a member’s lifecycle is the first five minutes after they pay. If they have to hunt for your community page or request access manually, the excitement fades.
I have found that the best solution is to create an automated Welcome Committee.
Instead of just sending a cold transaction receipt, I use Uncanny Automator to instantly introduce the new member to the community.
For example, as soon as a payment goes through, the system can automatically post a shoutout in your member forum, Facebook group, or Slack channel saying:
Please welcome [Name] to the tribe!
This immediate public recognition makes the new member feel seen and valued before they even log in.
To do this, you will need the Pro version. You can get an overview of how to use the plugin in our guide on how to create automated workflows in WordPress with Uncanny Automator.
You will also need an active community platform. For this tutorial, I will be using BuddyBoss, but the process is similar for other platforms.
If you haven’t built one yet, you can follow our full guide on how to create a private community with WordPress.
Once your tools are active, go to Automator » Add New and create a Logged-in recipe.
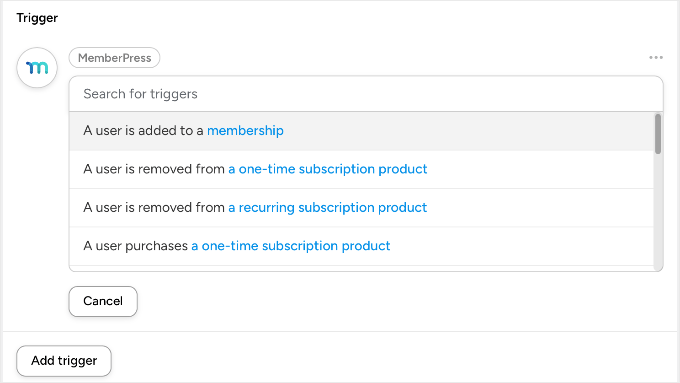
Step 1: The Trigger
Select the ‘MemberPress’ integration and choose the trigger: ‘A user is added to a membership’. Then, select the specific membership level (for example, ‘Gold Plan’).
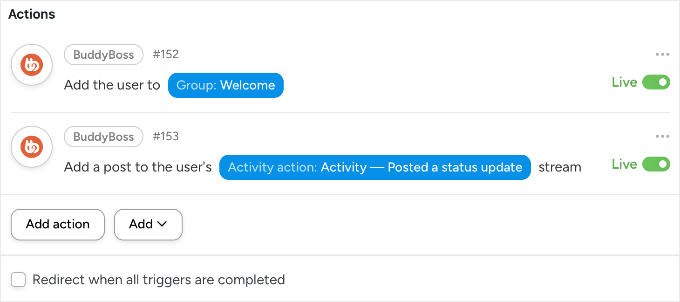
Step 2: The Actions
We want to make the user feel famous instantly. Select the ‘BuddyBoss’ integration (or whichever online community platform you are using) and add these two actions:
- Action 1: ‘Add the user to a group’. Select your ‘Welcome’ or ‘Introductions’ group.
- Action 2: ‘Post to the user’s activity stream’. You can automate a message like: “I just joined the Gold Community! Say hello! 👋”
Now, the moment a user buys, they are instantly part of the tribe. Their profile is active, they are in the group, and they have a post that others can like and comment on. This builds immediate ‘social stickiness’.
2. Keep Members Coming Back With Drip-Fed Content
I have seen many membership sites fail because they overwhelm their users on day one. If you give a new member instant access to 500 videos, they often feel paralyzed and eventually cancel because they ‘don’t have time.’
The solution we use at our own video membership site is drip content. By releasing material on a schedule, you give members a compelling reason to stay subscribed month after month.
MemberPress makes this incredibly easy by automatically handling the timeline for each user.
To set this up, go to MemberPress » Rules and click ‘Add New’. Under ‘Protected Content’, select the content (like a specific category of posts or a single course page) you want to delay.
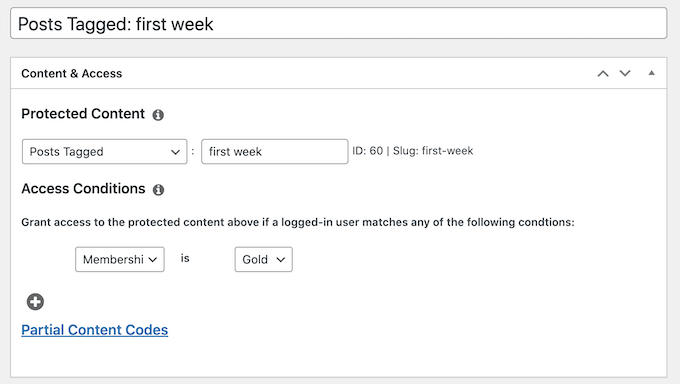
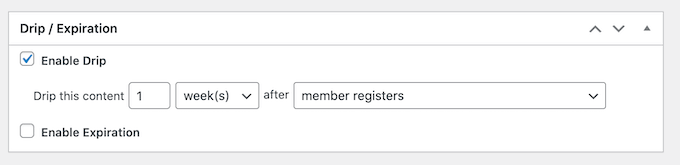
Next, scroll down to the ‘Drip / Expiration’ section and check the ‘Enable’ box.
Here, you can set the rule to trigger after a specific time. For example, you can set it to ‘7’ days after ‘Member Registers’.
My Favorite Trick: You can also use Fixed Date dripping. I use this to release special holiday content (like a Black Friday bonus) that becomes available to everyone on the same day. It creates a ‘cohort effect‘ where the whole community discusses the new content simultaneously, boosting engagement.
Instead of binging and leaving, members develop a habit of returning to your site. This simple change transforms a one-time visitor into a long-term subscriber.
For step-by-step instructions on setting up both scheduled and fixed-date dripping, see our guide on how to add automatic drip content in your WordPress site.
3. Re-engage At-Risk Members
In my experience, members typically leave for one of two reasons: either they lose interest and drift away, or they get frustrated and angry. The good news is that you can use automation to catch both types before they cancel.
Here are two different ‘watchdog’ automations I use to save these members:
Method 1: Catch ‘The Drifter’ With a FunnelKit Winback
When a member stops logging in, they are usually just weeks away from cancelling. You need to catch them while they still remember you.
For this, I recommend using FunnelKit Automations. Because it lives inside your WordPress dashboard, FunnelKit can see the exact moment a user logs in. Most external email tools cannot access this real-time data.
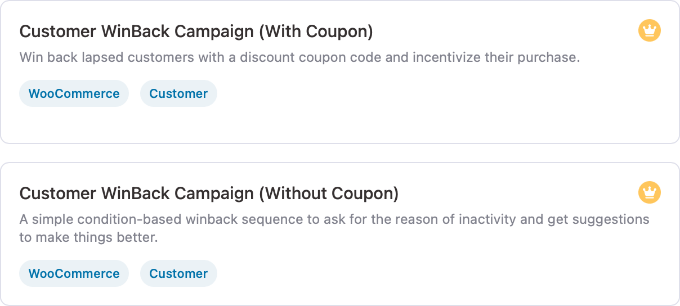
To set up this automation, just go to FunnelKit Automations » Automations and click ‘Create Automation’. You will see two specific templates:
- Customer Winback (No Coupon): I recommend starting here. It sends a ‘We miss you’ email highlighting popular content or asking if they need help. It re-engages users without eating into your profits.
- Customer Winback (With Coupon): Use this for members who have been inactive for a long time (e.g., 60+ days). It automatically generates a unique discount code to incentivize them to return.
For a full walkthrough of setting this up, see our guide on how to send automated coupons to bring back customers.
Method 2: Catch ‘The Complainant’ Using Sentiment Analysis
Sometimes, a member is active but unhappy. If they send a frustrated message to support, then you want to know immediately.
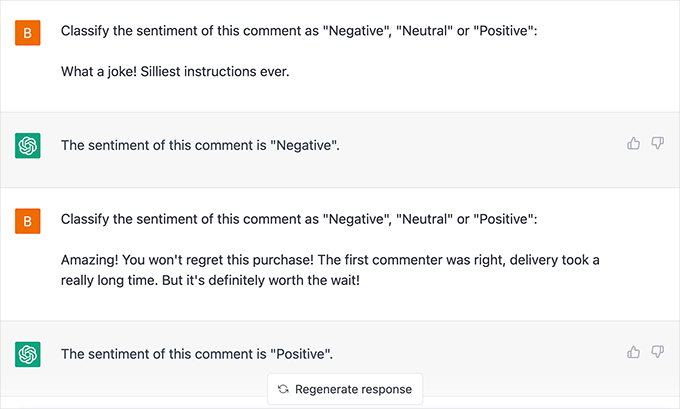
You can use Uncanny Automator‘s OpenAI integration to analyze the text of incoming contact forms. If the AI detects negative sentiment, then you can automate an urgent notification to your team on Slack or email.
This lets you jump in and save the relationship before they hit ‘Cancel’. To learn exactly how to build this, see our guides on how to use AI for customer service in WordPress and how to use OpenAI on WordPress.
4. Simplify Payment Issues with Automatic Reminders
Involuntary churn is frustrating because these members actually want to stay. Their credit card simply expired, or their bank declined the transaction.
If you do not have a system to catch these failures, then you will lose revenue instantly. Here are two ways to automate your recovery process using MemberPress.
Safety Note: Whenever you customize billing emails or dunning sequences, I recommend performing a test transaction with a test credit card. This ensures your ‘Update Payment’ links work correctly and don’t lead to a 404 error.
Method 1: The Essential Notification (Native Emails)
MemberPress has built-in emails that fire when a card fails. To check them, go to MemberPress » Settings » Emails.
Ensure the ‘Failed Transaction’ and ‘Credit Card Expiring’ emails are checked. I strongly recommend clicking ‘Edit’ to customize the message.
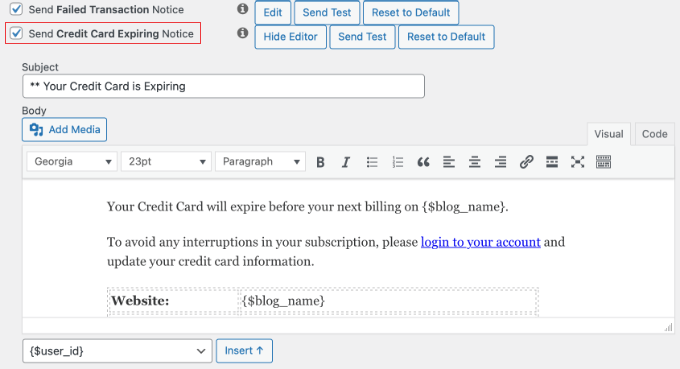
Just make sure you don’t sound like a robot. I recommend using a helpful subject line like ‘Action Required: Don’t lose access to [Site Name]’ rather than a scary ‘Payment Failed’ notice.
Be friendly and provide a direct link to the user’s Account page so they can update their card in seconds.
Method 2: The Dunning Sequence (Automated Recovery)
Sending just one email isn’t enough because people get busy and forget. To send a sequence (say on Day 3 and Day 7), you can use the MemberPress » Reminders feature.
Click ‘Add New’ and set the trigger to ‘After Subscription Expires’.
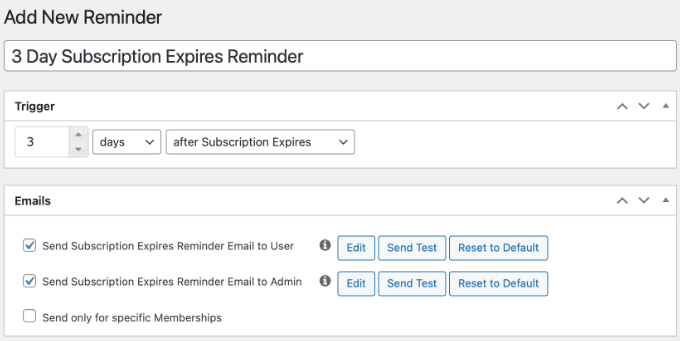
You can create multiple reminders, say one for ‘3 Days After’ and another for ‘7 Days After’. This persistent (but polite) sequence often recovers significantly more revenue than a single notice.
5. Celebrate Loyalty With an Anniversary Gift
One of the biggest reasons members churn is that they feel unappreciated. A simple ‘Thank You’ at the right moment can reset their commitment for another year.
I recommend setting up an automated anniversary gift email. This is not a receipt, it is a celebration.
For instance, you can use automation to celebrate your members in several ways:
- Hidden Bonus Module: Unlock a course or lesson that only becomes available after their first year.
- Digital Loyalty Badge: Send a badge that appears on their community profile.
- Surprise Discount: Offer a discount code they can apply to their next renewal or upgrade.
The goal is to turn a routine billing date into a moment of delight. This makes members feel valued and far less likely to cancel when their bill comes due.
You can do this using the MemberPress » Reminders feature (the same tool we used for payment failures). Simply click ‘Add New’ and configure the timing to send ‘1 Year After Member Signs Up’.

Here’s what you should include in the email:
- A celebration: ‘Happy 1 Year Anniversary!’
- A surprise gift: A link to a hidden bonus video, a PDF cheat sheet, or a special discount code (like
LOYALTY20) that they can apply to their next upgrade.
This creates a ‘positive surprise’ moment. Members who feel valued are far less likely to cancel when their bill comes due.
6. Save Departing Members by Understanding Their Needs
Sometimes, despite your best efforts, a member will decide to leave.
However, the moment they click ‘Cancel’ does not have to be the end of the road. You can use two distinct strategies to turn this negative into a positive.
Strategy 1: The ‘Save’ Offer (Downsells & Pauses)
Before processing the cancellation, offer an alternative. Many members cancel simply because of temporary budget tightness or a lack of time.
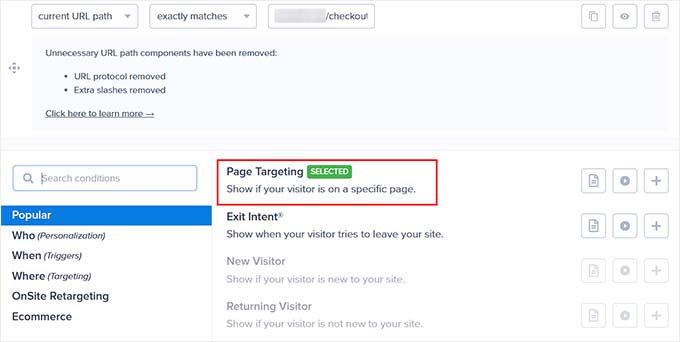
The trick is to use OptinMonster, which is the best popup plugin lead generation software for marketers. It offers page targeting rules that trigger a popup specifically when a user visits your ‘Account Cancellation’ page. This is your last line of defense.
This popup should offer:
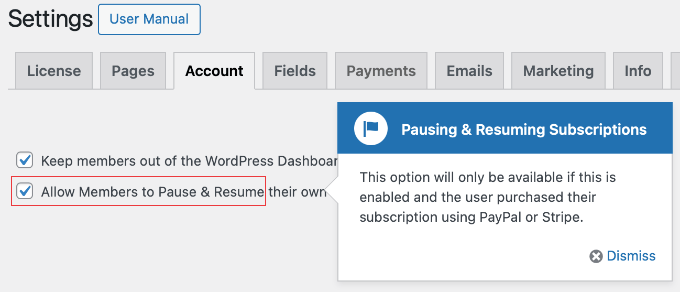
- A Pause Option: “Need a break? Pause your membership for 30 days.” First, enable ‘Self-Service Pauses’ in your MemberPress » Settings. Then link the popup button to the MemberPress Account page so they can switch their status to ‘Paused’ instead of cancelling.
- A Downsell: “Switch to our Lite plan for half the price.”
This strategy is powerful because it catches the user right at the moment of decision. By addressing their objection (cost or time) before they click the final button, you give them a valid reason to stay.
See our case study on how OptinMonster boosts conversions to learn more about how targeted popups can influence user behavior.
You can also read our complete OptinMonster review to learn more about how it works.
Strategy 2: The Exit Survey
If the user declines your offer and proceeds to cancel, your goal shifts to gathering data. You need to know why they are leaving so you can fix the problem for future members.
I recommend embedding a simple survey on your ‘Cancellation Confirmation’ page. You can use WPForms or UserFeedback to ask a single question: “What is the main reason you are cancelling?”
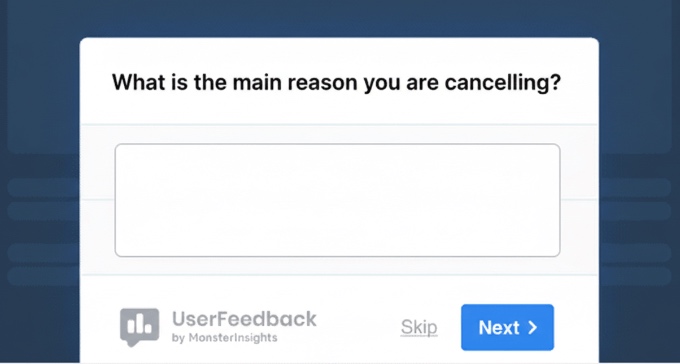
If you see a trend, like lots of people complaining about video playback issues, then you know exactly what to fix.
For more details, see our guide on how to create a survey in WordPress.
Frequently Asked Questions About Membership Churn
Understanding how to use automation to reduce churn on your membership site is important for maintaining and growing your subscriber base.
Here are answers to some of the most common questions, paired with actionable insights to help you make changes effectively.
1. What is the difference between voluntary and involuntary churn?
Voluntary churn occurs when members cancel their subscriptions by choice, often due to dissatisfaction or a perceived lack of value. In contrast, involuntary churn happens when memberships lapse unintentionally, such as through failed payments or expired credit cards.
2. How often should I send re-engagement emails without being annoying?
It’s important to find the right frequency for re-engagement emails. A typical strategy is to send an email after 14 days of inactivity. If there’s no response, follow up once every week or two, adjusting as needed based on user feedback and engagement levels.
Tools like Uncanny Automator and FunnelKit can help automate and personalize these sequences to reduce annoyance.
3. Is it better to offer a discount or a ‘pause’ option to prevent cancellation?
Offering a ‘pause’ option can be more beneficial for long-term retention as it acknowledges the member’s circumstances without completely severing the relationship.
However, discounts can be effective in specific contexts when paired with limited-time offers and incentives. Using OptinMonster’s popups can help present these options strategically.
4. Why are smart engagement triggers important for membership sites?
Engagement triggers, such as those set up through Uncanny Automator, are important for identifying members who might be at risk of churn due to inactivity.
By using smart engagement strategies, you can activate re-engagement campaigns that offer tailored content and support and reduce the risk of losing members.
Additional Resources for Membership Websites
I hope this article helped you learn smart automated solutions to keep members hooked on your membership site.
You might also like to see these additional resources:
- Best WordPress Membership Plugins (Compared) – A comprehensive comparison for small business owners looking for advanced membership automation features like dripping and dunning.
- How to Create Automated Workflows in WordPress With Uncanny Automator – A technical deep dive into Uncanny Automator, providing the recipe foundations for the re-engagement and community triggers discussed in this post.
- How to Easily Add a Client Feedback Form in WordPress – A step-by-step tutorial on setting up the automated exit surveys that help you turn cancellations into actionable business insights.
- How to Track User Engagement in WordPress with Google Analytics – Explains how to set up tracking to identify ‘quiet’ members before they hit the 14-day inactivity trigger.
If you liked this article, then please subscribe to our YouTube Channel for WordPress video tutorials. You can also find us on Twitter and Facebook.
The post 6 Automation Tricks to Reduce Churn on Your Membership Site first appeared on WPBeginner.
Related Posts
How to Automate WordPress Forms With n8n – Save Hours of Manual Work
I used to spend hours each week moving data from…

Tom Goldstein Won $51 Million Against Billionaire Heads-Up Legend Andy Beal
PokerNews has learned Beal was Goldstein's previously unnamed opponent.

Robert Clarke Turns a Freeroll Into an 888poker LIVE London Main Event Shot
Robert Clarke turned a freeroll entry into a £1,250 888poker…